


Table of Contents
When your bathroom tiles in Alkapuri or Sayajigunj start showing signs of damage or you’re planning a complete makeover, the biggest concern is how to remove bathroom tiles without breaking them for potential reuse or to avoid damaging the underlying wall. Many Vadodara homeowners face this challenge during their ghar sudharo projects, especially when dealing with expensive imported tiles or vintage pieces that hold sentimental value. The key lies in using the right technique, proper tools, and patience – something that separates professional results from DIY disasters. If you’re looking for expert guidance on your tile removal project, Book a Free Site Visit to get personalized advice from experienced professionals.
2026 Cost Guide for Tile Removal in Vadodara
Understanding the cost implications of tile removal in Vadodara’s current market helps you budget effectively for your bathroom renovation project. The pricing varies significantly based on tile type, wall condition, and whether you’re attempting DIY or hiring professionals.
| Service Category | Basic Range (₹) | Mid-Range (₹) | Premium Range (₹) |
|---|---|---|---|
| DIY Tool Rental + Materials | ₹2,500 – ₹4,000 | ₹4,500 – ₹7,000 | ₹8,000 – ₹12,000 |
| Professional Tile Removal (per sq ft) | ₹45 – ₹65 | ₹70 – ₹95 | ₹100 – ₹150 |
| Wall Preparation + Cleaning | ₹25 – ₹35 per sq ft | ₹40 – ₹55 per sq ft | ₹60 – ₹85 per sq ft |
| Waste Disposal in Vadodara | ₹1,500 – ₹2,500 | ₹3,000 – ₹4,500 | ₹5,000 – ₹7,500 |
The basic range covers standard ceramic tiles with simple adhesive, while premium range includes natural stone tiles, multiple tile layers, or tiles installed with strong cement-based adhesives. Material costs in Gujarat have increased by 12-18% since 2022, affecting both tool rental and professional service pricing.
Pro Tip: Factor in potential wall repair costs of ₹35-80 per sq ft if you’re planning to install new tiles immediately after removal.
Essential Tools and Materials Guide
Success in removing bathroom tiles without breaking depends heavily on having the right tools and materials. The investment in proper equipment pays off through preserved tiles and undamaged walls.
Must-Have Tools for Tile Removal
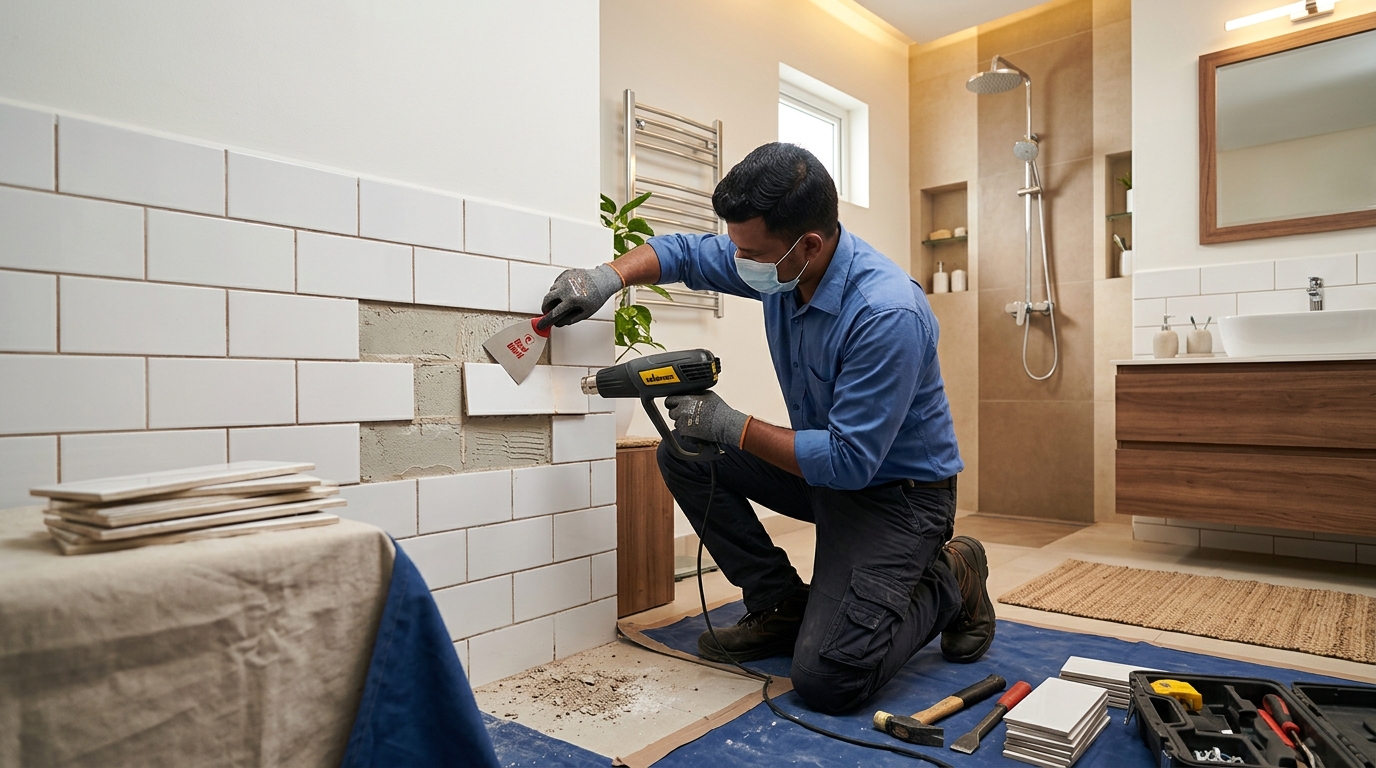
The foundation of any successful tile removal project starts with professional-grade tools. A manual tile removal tool or oscillating multi-tool provides the precision needed for delicate work. Heat guns help soften adhesive, while various chisel sizes handle different tile dimensions and grout widths.
- Oscillating Multi-Tool: ₹3,500 – ₹8,500 (Bosch, Makita brands work well in Vadodara’s humidity)
- Manual Tile Puller: ₹1,200 – ₹2,800 (essential for intact removal)
- Heat Gun: ₹2,000 – ₹4,500 (softens adhesive effectively)
- Grout Removal Tool: ₹800 – ₹1,500 (manual or electric options)
- Various Chisels: ₹500 – ₹1,200 (flat, pointed, and angled varieties)
Safety Equipment and Protective Gear
Bathroom tile removal generates significant dust and debris, making safety equipment non-negotiable. Quality protective gear prevents injuries and health issues during the removal process.
Safety glasses protect against flying tile fragments, while dust masks prevent inhalation of harmful particles. Heavy-duty gloves provide grip and protect hands from sharp edges, and knee pads ensure comfort during extended floor-level work.
- Safety glasses with side protection
- N95 or P2 dust masks
- Heavy-duty work gloves
- Knee pads for floor work
- Drop cloths and plastic sheeting
Contractor Insight: Invest in a good quality oscillating tool – it’s the difference between 70% intact tile removal and 30% success rate with basic chisels.
Step-by-Step Tile Removal Process
The systematic approach to tile removal determines whether your tiles remain intact for reuse or end up in the waste pile. Each phase requires patience and the right technique to achieve professional results.
Phase 1: Preparation and Assessment
Start by thoroughly cleaning the tile surface and identifying the grout type and tile installation method. Remove all fixtures, mirrors, and accessories from the wall area. Cover surrounding surfaces with plastic sheeting to contain dust and debris.
Test a small corner area to determine adhesive strength and tile fragility. This test reveals the best removal approach for your specific installation. Document the tile layout with photos if you plan to reinstall the same tiles.
- Clear the bathroom completely and ensure adequate ventilation
- Identify tile type, size, and installation method used
- Test remove one tile in an inconspicuous corner
- Set up dust containment and safety equipment
- Plan your removal sequence from top to bottom
Phase 2: Grout Removal
Grout removal is the most critical step for preserving tiles during removal. Use a grout removal tool to carefully cut along all grout lines without touching the tile edges. Work slowly and methodically, as rushed grout removal often leads to chipped tiles.
Apply steady, consistent pressure while following the grout lines precisely. Clean out loose grout debris regularly to maintain clear sight lines. The goal is complete grout removal around each tile before attempting tile extraction.
- Start with horizontal grout lines, then vertical ones
- Maintain consistent tool angle to avoid tile damage
- Use vacuum frequently to clear debris
- Check for complete grout removal before proceeding
Phase 3: Tile Extraction Technique
With grout completely removed, begin tile extraction using the oscillating tool or manual tile puller. Start from corners or edges where you can get better leverage. Apply heat to stubborn tiles to soften the adhesive before attempting removal.
Work the tool behind each tile gradually, maintaining steady pressure without forcing. If resistance is high, apply more heat and wait for the adhesive to soften. Keep removed tiles organized and protected to prevent damage during the process.
Expert Technique: For natural stone or expensive tiles, use the “corner-to-corner” method – start at one corner and work diagonally across the tile face for maximum preservation.
Common Mistakes Homeowners Make
Understanding common pitfalls in tile removal helps you avoid costly errors and damaged tiles. These mistakes often stem from impatience or inadequate preparation, leading to frustration and wasted materials.
Mistake 1: Rushing the Grout Removal Process
The most frequent error is attempting to remove tiles without completely clearing the grout. Partial grout removal creates stress points that crack tiles during extraction. Many homeowners underestimate the time required for thorough grout removal, leading to damaged tiles and additional costs.
Complete grout removal takes 60-70% of the total project time. Rushing this phase to save time ultimately costs more in broken tiles and wall repairs. Professional contractors spend extra time on grout removal because they understand its importance for tile preservation.
- Incomplete grout removal causes 80% of tile breakage
- Proper grout removal takes 2-3 hours per 50 sq ft area
- Using wrong grout removal tools damages tile edges
- Skipping corner and edge grout leads to tile cracking
Mistake 2: Using Excessive Force During Removal
Forcing tiles off the wall when they resist removal is a guaranteed way to break them. High-quality adhesives require patience and the right technique, not brute force. Heat application and gradual pressure work better than aggressive hammering or prying.
Tiles installed with strong adhesives need time for heat penetration and adhesive softening. Forcing removal before the adhesive releases creates fractures that spread through the tile. Professional removal relies on technique and patience rather than force.
Mistake 3: Inadequate Heat Application
Many DIY enthusiasts either skip heat application entirely or use insufficient heat to soften adhesives. Modern tile adhesives, especially those used in Vadodara’s humid climate, require specific temperature ranges for effective softening.
Insufficient heat leaves adhesives rigid, making tile removal nearly impossible without breakage. Conversely, excessive heat can damage tiles or create dangerous working conditions. The key is consistent, moderate heat application over adequate time periods.
- Heat gun distance should be 6-8 inches from tile surface
- Apply heat for 30-60 seconds per tile before removal attempt
- Move heat gun continuously to prevent tile overheating
- Test heat effectiveness on corner tiles first
Mistake 4: Poor Tool Selection and Maintenance
Using inappropriate tools or dull cutting edges significantly increases tile breakage rates. Many homeowners attempt tile removal with basic household tools that lack the precision needed for delicate work.
Dull grout removal tools require excessive pressure, leading to slipped cuts and tile damage. Similarly, using hammers instead of proper extraction tools creates shock waves that crack tiles. Investment in proper tools pays for itself through preserved tiles and reduced wall damage.
Professional Advice: Sharp tools require less pressure and provide better control – replace cutting edges every 100-150 sq ft of tile removal for optimal results.
Timeline and Project Phases
Realistic time expectations prevent rushed work and improve tile preservation rates. The timeline varies significantly based on tile type, wall condition, and removal difficulty, but following a structured schedule ensures better results.
Small Bathroom Timeline (40-60 sq ft)
A typical small bathroom tile removal project requires 2-3 full days for complete, careful removal. Day one focuses on preparation and initial grout removal, while day two handles the bulk of tile extraction. Day three covers cleanup, wall preparation, and final inspection.
Professional contractors typically complete small bathrooms in 1.5-2 days due to experience and specialized tools. However, DIY projects benefit from extended timelines that allow for learning and careful work. Rushing small projects often results in more broken tiles than time saved.
- Day 1: Setup, assessment, and 40% grout removal (6-8 hours)
- Day 2: Complete grout removal and 60% tile extraction (8-10 hours)
- Day 3: Final tile removal, cleanup, and wall prep (4-6 hours)
Medium Bathroom Timeline (80-120 sq ft)
Medium-sized bathrooms require 4-5 days for complete DIY removal, with additional time for complex layouts or multiple tile types. The extended timeline allows for proper technique development and reduces fatigue-related mistakes.
Planning rest periods prevents the rushing that leads to tile breakage. Professional removal of medium bathrooms typically takes 2.5-3.5 days, depending on tile complexity and wall conditions. Factor in additional time for unexpected challenges like multiple adhesive layers or damaged substrate.
- Preparation and tool setup: 4-6 hours
- Complete grout removal: 12-16 hours (spread over 2 days)
- Tile extraction phase: 10-14 hours (2-3 days)
- Cleanup and wall preparation: 3-5 hours
Factors That Extend Timeline
Several factors can significantly extend removal timelines, particularly in older Vadodara homes where multiple renovation layers exist. Natural stone tiles, thick adhesive applications, and damaged substrate conditions all require additional time and care.
Multiple tile layers, common in renovated properties, can double or triple removal time. Each layer requires separate grout removal and extraction phases. Additionally, tiles installed over painted surfaces or damaged drywall need extra care to prevent wall damage.
Timeline Reality Check: Add 30-40% buffer time to your initial estimates – most tile removal projects take longer than expected, especially for first-time DIY attempts.
Post-Removal Wall Care and Maintenance
Proper wall care after tile removal determines the success of your next installation phase. The condition of the substrate directly affects new tile adhesion and long-term durability, making post-removal maintenance crucial for project success.
Immediate Post-Removal Assessment
Once tiles are removed, thoroughly inspect the wall surface for damage, remaining adhesive, and structural issues. Look for cracks, holes, or soft spots that require repair before new installation. Document any problems with photos for reference during repair planning.
Remove all remaining adhesive residue using appropriate solvents or mechanical methods. Adhesive remnants prevent proper bonding of new materials and create uneven surfaces. Clean walls with degreasing agents to remove any soap residue or oils that might affect new adhesive performance.
- Inspect for cracks, holes, or structural damage
- Remove all adhesive residue completely
- Clean walls with appropriate degreasing agents
- Check for moisture issues or water damage
- Test wall surface hardness and stability
Wall Repair and Preparation Procedures
Address any wall damage immediately to prevent moisture infiltration and structural problems. Fill holes and cracks with appropriate filler materials, ensuring complete curing before proceeding. Sand rough areas smooth to create an even surface for new installations.
Prime repaired areas with quality primer suitable for bathroom environments. Vadodara’s humidity requires moisture-resistant primers that prevent future adhesion failures. Allow adequate curing time between repair, priming, and new tile installation phases.
Moisture Management and Prevention
Bathroom walls face constant moisture exposure, making proper sealing essential after tile removal. Check for existing moisture problems that might have contributed to tile failure. Address any plumbing leaks or ventilation issues before proceeding with new installations.
Apply appropriate moisture barriers or sealers based on wall material and planned tile type. Concrete walls may need different treatment than drywall surfaces. Consider upgrading ventilation systems if moisture damage was evident during tile removal.
- Identify and fix any moisture sources
- Apply appropriate moisture barriers
- Ensure adequate bathroom ventilation
- Test moisture levels before new installation
- Plan maintenance schedule for ongoing care
Maintenance Tip: Wait 48-72 hours after wall preparation before installing new tiles – proper curing prevents future adhesion failures and extends tile life significantly.
How to Choose the Right Contractor in Vadodara
Selecting the right contractor for tile removal ensures professional results and protects your investment in quality tiles. The difference between experienced professionals and general handymen becomes evident in tile preservation rates and wall condition after removal.
Verify Specialized Tile Removal Experience
Look for contractors with specific experience in tile removal rather than general demolition work. Ask for examples of previous tile removal projects and preservation rates achieved. Experienced tile removal specialists understand the nuances of different adhesive types and tile materials common in Vadodara’s construction market.
Request references from recent tile removal projects, particularly those involving similar tile types to yours. Contact previous clients to inquire about tile preservation rates, cleanup quality, and overall satisfaction. Contractors confident in their skills will readily provide references and project photos.
- Minimum 5 years of tile removal experience
- Portfolio of successful tile preservation projects
- References from recent similar projects
- Knowledge of local tile and adhesive types
- Proper insurance coverage for property damage
Assess Tool Quality and Methodology
Professional contractors invest in quality tools specifically designed for tile removal. During initial consultations, observe the tools they bring and their approach to assessment. Contractors using basic demolition tools rather than specialized tile removal equipment may not achieve the preservation rates you expect.
Ask about their specific methodology for different tile types and adhesive systems. Experienced professionals can explain their approach and adjust techniques based on your specific situation. They should also discuss timeline expectations and potential challenges specific to your project.
Evaluate Pricing Structure and Transparency
Quality tile removal contractors provide detailed pricing that separates removal costs from cleanup and disposal fees. Be wary of extremely low quotes that may indicate corner-cutting or inexperience. Conversely, excessively high quotes should be justified with specific value propositions.
Transparent contractors explain their pricing structure and provide written estimates with clear scope definitions. They should also discuss potential additional costs for unexpected conditions like multiple adhesive layers or wall repairs. If you’re looking for transparent pricing and expert tile removal services, schedule your free site visit for a detailed assessment.
Check Local Reputation and Standing
Research contractors’ reputations within Vadodara’s construction community and among local suppliers. Established contractors maintain relationships with tile suppliers and other tradespeople, indicating professional standing. Check online reviews, but focus on detailed reviews that mention specific project aspects.
Verify business registration and any relevant trade certifications. Professional contractors maintain proper business practices and stay updated on industry best practices. Local building material suppliers often know which contractors consistently deliver quality work.
Communication and Project Management Skills
Effective communication during initial consultations indicates how the contractor will handle your project. They should ask detailed questions about your goals, timeline, and budget constraints. Professional contractors provide clear explanations and realistic expectations rather than making unrealistic promises.
Assess their project management approach, including scheduling, progress updates, and site cleanliness standards. Quality contractors maintain organized work sites and provide regular progress updates. They should also have clear policies for handling unexpected discoveries or changes in project scope.
Contractor Selection Tip: The best tile removal contractors often come recommended by tile installation professionals – they work together regularly and understand each other’s quality standards.
Frequently Asked Questions
What is the success rate for removing bathroom tiles without breaking them in Vadodara’s climate?
Professional tile removal in Vadodara typically achieves 75-85% intact tile preservation rates, depending on tile type and installation method. Ceramic tiles installed with standard adhesives show the highest preservation rates, while natural stone tiles require more careful handling but can still achieve 70-80% success rates. The key factors affecting success include grout removal thoroughness, heat application technique, and the quality of tools used. DIY attempts generally achieve 50-60% preservation rates due to learning curve and tool limitations, making professional removal worthwhile for valuable tiles.
How long does it take to remove bathroom tiles without breaking them from a 100 sq ft wall?
Professional removal of 100 sq ft of bathroom tiles typically takes 2-3 full working days when preservation is the priority. The timeline includes thorough grout removal (which takes 60-70% of total time), careful tile extraction, and initial wall cleanup. DIY projects generally require 4-5 days for the same area, with additional time needed for learning proper techniques and working more cautiously. Factors like tile size, adhesive type, and wall accessibility can extend timelines by 20-30%. Natural stone tiles or complex patterns may require additional time for specialized handling techniques.
What tools are essential for removing bathroom tiles without damaging them?
The most critical tool for intact tile removal is an oscillating multi-tool with sharp cutting blades for precise grout removal. A heat gun is essential for softening adhesive, while manual tile pullers provide controlled extraction force. Quality safety equipment including dust masks, safety glasses, and work gloves protects both you and the work area. Additional helpful tools include various chisel sizes, a shop vacuum for debris removal, and plastic sheeting for containment. Professional-grade tools typically cost ₹8,000-15,000 but significantly improve preservation rates compared to basic household tools.
Can tiles removed from bathroom walls be reused for new installations?
Yes, carefully removed tiles can be successfully reused if they remain intact and are properly cleaned of old adhesive. The key is complete removal of old adhesive residue from tile backs using appropriate solvents or mechanical methods. Reused tiles should be inspected for hairline cracks or chips that might affect performance in the new installation. Professional cleaning and preparation of reused tiles typically costs ₹15-25 per sq ft but can save 40-60% compared to new tile purchases. However, factor in potential color variations if matching with new tiles, and always purchase 10-15% extra tiles to account for breakage during removal and reinstallation.
What are the main challenges of removing tiles from bathroom walls in Vadodara’s humid climate?
Vadodara’s high humidity affects both tile adhesive properties and removal techniques, often making adhesives more flexible but also more tenacious. The moisture can cause some adhesive types to soften naturally, which can be advantageous, but it also means mold or moisture damage behind tiles is more common and requires additional attention. Seasonal variations affect removal difficulty – monsoon periods may require longer drying times for wall preparation, while summer heat can make working conditions challenging. Additionally, the local preference for strong cement-based adhesives in humid climates means removal often requires more heat application and patience compared to standard polymer adhesives used in drier regions.
Conclusion
Successfully removing bathroom tiles without breaking them requires the right combination of proper tools, proven techniques, and most importantly, patience throughout the process. Whether you’re planning a complete makaan renovation in Vadodara or simply updating your bathroom tiles, the methods outlined in this guide will help you preserve valuable tiles for reuse while maintaining wall integrity. The investment in quality tools and careful technique pays dividends through preserved materials and reduced waste disposal costs.
For homeowners in Vadodara who want guaranteed results without the learning curve and potential mistakes of DIY removal, professional services offer the expertise and specialized equipment needed for optimal tile preservation. JKC Buildcon Services brings over 25 years of experience in careful tile removal and bathroom renovation projects throughout Vadodara, with a proven track record of achieving high tile preservation rates while maintaining strict timelines and quality standards.
The key to successful tile removal lies in understanding that each project is unique, requiring assessment of tile type, adhesive system, and wall condition before beginning work. Professional contractors can quickly identify the best approach for your specific situation and execute the removal with minimal tile loss and wall damage. If you’re ready to start your bathroom renovation project with expert tile removal services, get a free on-site consultation to discuss your specific requirements and receive a detailed project plan tailored to your needs and timeline.